Why is it Essential to Upgrade the Environment?
It’s recommended to upgrade VMware vSphere as per VMware standards because VMware vSphere adds many features, which helps to scale up the infrastructure and efficiently manages new or existing infrastructure. To be compatible and benefit from all the latest features like the Advanced Hypervisor feature, better memory management, protection from security vulnerabilities, and more, it is vital to upgrade the existing host to the latest version.
Advantages of Upgrading ESXi Host
If the server runs on ESXi 6.5 version, the VMware environment has certain advantages when upgraded to 6.7 or 7. A few benefits are fault tolerance support to 8 Vcpu, Cross vCenter Encrypted VMotion, Maximum vCenter Server request latency, and high performance. Have an admin crosscheck if the processor is compatible before the upgrade. The old processors may not be compatible with ESXi 6.7 or higher.
Download the correct compatible version from My.Vmware.com. After downloading the correct image, an admin creates a baseline to import the image from vCenter.
Prerequisites
Before the upgrade, have an admin crosscheck if the host is in maintenance mode, and all the VMs should be migrated to another host in the cluster. Below are a few possible reasons why VM migration could fail.
- Different VMotion Port Groups: All the hosts in the cluster are to be aligned in the same VMotion port group. If they are in different port groups, the VMs will not migrate, then the host may fail to move to maintenance mode.
- Affinity/Anti Affinity Rules: While upgrading ESXi host in a cluster where SQL VMs are hosted, it is required to check any affinity rules are applied. If yes, then migrate VM within the host group where VM is allowed to migrate.
- High CPU Reservations: VMs will not migrate if any VM has a CPU reservation and another host cannot accommodate the VM. In this case, try to vacate a few VMs from another host and move the VM to that host with enough CPU space to accommodate.
- Snapshots: VMs will also fail to migrate if they have active snapshots.
- DRS (Distributed Resource Management): VMs trigger the VMotion when the host is in maintenance mode; hence set the DRS settings to automated mode. If the DRS settings are in manual mode, manually migrate the VMs to a different host.
When all these set conditions are met, move the VM to another host and proceed to the ESXi upgrade activity. If you are not using vCenter, power off the VMs residing on the host, then upgrade.
Roll Back: If the user encounters any issues after the ESXi upgrade, one can easily opt to roll back the upgrade to the previous version post activity.
- To roll back to the previous version of ESXi, select <Shift+R: Recovery mode>
- Press Y and for the rollback to be initiated, and it boots up with the old version.
We evaluated two techniques to Upgrade ESXiUgrade
- Option 1: Sphere Update Manager (VUM)
- Option 2: ESXCLI command line
Option 1: Sphere Update Manager (VUM)
VUM is widely used to manage the upgrade of the ESXi host from vSphere 6.0 to vSphere 6.7. However, before upgrading the vSphere ESXi host, we need to download VMware vSphere Hypervisor (ESXi) 6.7 installation ISO, downloaded from My.VMware.com.
Creating a baseline is required as we will be using VUM to perform the upgrades of our ESXi host. This article will also explain how to make the baseline that is used during VUM upgrade. Last, we need at least one vSphere ESXi host to upgrade with our VUM baseline.
After completing ESXi 6.7 installation ISO download, we need to import the image and create a baseline, as shown below.
Let us take a deep dive through the screenshots below to understand the process. Illustrated images are used only for reference purposes.
Importing the Image
-
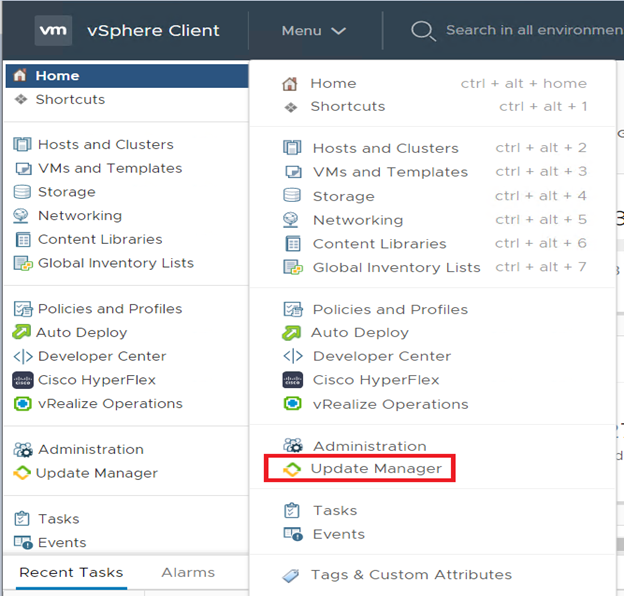
- Click on Update Manager from the Menu buttonImage may be NSFW.
Clik here to view.
- Click on Update Manager from the Menu buttonImage may be NSFW.
-
- Click on ESXi Images and select ImportImage may be NSFW.
Clik here to view.![Import image with ESXi]()
- Click on ESXi Images and select ImportImage may be NSFW.

-
- Click on Browse and upload the download imageImage may be NSFW.
Clik here to view.![Import]()
- Click on Browse and upload the download imageImage may be NSFW.

-
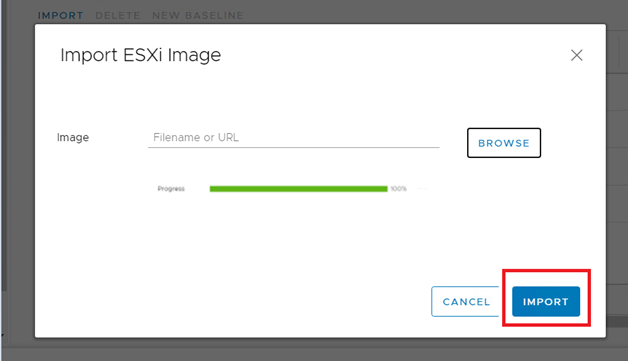
- Click Import once the action has reached 100%Image may be NSFW.
Clik here to view.![Import Filename from URL]()
- Click Import once the action has reached 100%Image may be NSFW.
-
- The image is imported (the complete image after the import)Image may be NSFW.
Clik here to view.![Complete Import]()
- The image is imported (the complete image after the import)Image may be NSFW.

Create Base Line
-
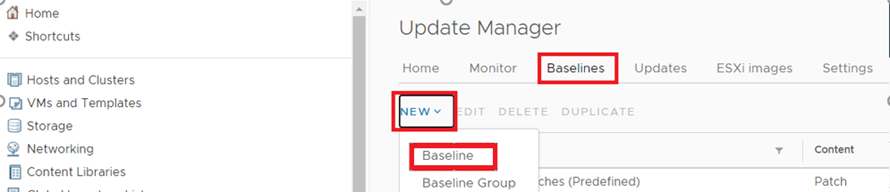
- From the Update Manager window, click on Baseline > New > New BaselineImage may be NSFW.
Clik here to view.![Create New Baseline]()
- From the Update Manager window, click on Baseline > New > New BaselineImage may be NSFW.
-
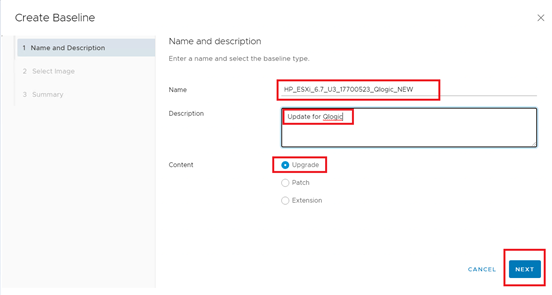
- Provide the required information, i.e., name and description and select upgrade, then select nextImage may be NSFW.
Clik here to view.![Upgrade Baseline]()
- Provide the required information, i.e., name and description and select upgrade, then select nextImage may be NSFW.
-
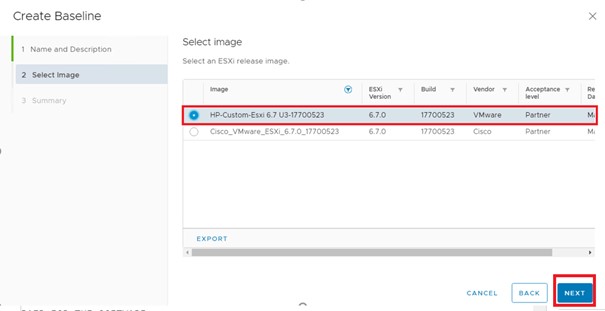
- Select the image and click nextImage may be NSFW.
Clik here to view.![Select Image for release]()
- Select the image and click nextImage may be NSFW.
-
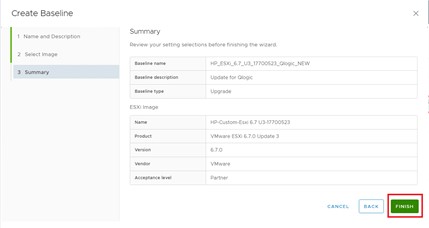
- Review and click FinishImage may be NSFW.
Clik here to view.![Review Image and Finish]()
- Review and click FinishImage may be NSFW.
Upgrade Host Using the New Baseline
-
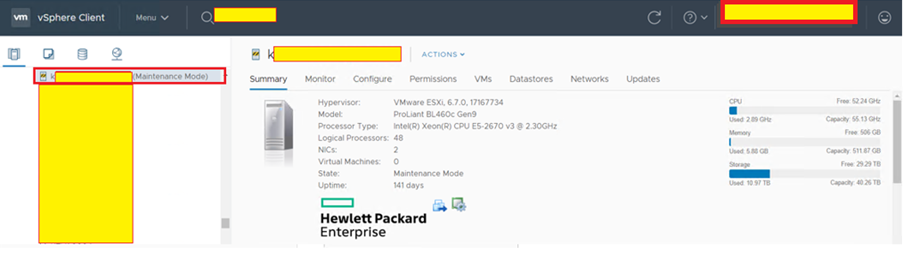
- The Host needs to be in Maintenance Mode before the upgradeImage may be NSFW.
Clik here to view.![]()
- The Host needs to be in Maintenance Mode before the upgradeImage may be NSFW.
-
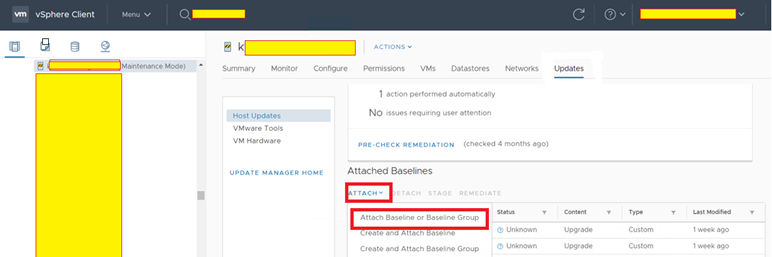
- From Host and Cluster View: select the host which requires an upgrade from the right pane. Select UpdatesImage may be NSFW.
Clik here to view.![Select Host to Upgrade]()
- From Host and Cluster View: select the host which requires an upgrade from the right pane. Select UpdatesImage may be NSFW.

-
- Select Attach Baseline or Baseline Group from the Baseline tabImage may be NSFW.
Clik here to view.![Identify Baseline Group]()
- Select Attach Baseline or Baseline Group from the Baseline tabImage may be NSFW.
-
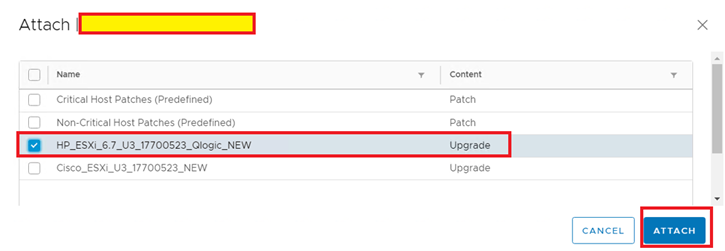
- Select the newly configured BaselineImage may be NSFW.
Clik here to view.![New Configured Baseline]()
- Select the newly configured BaselineImage may be NSFW.
-
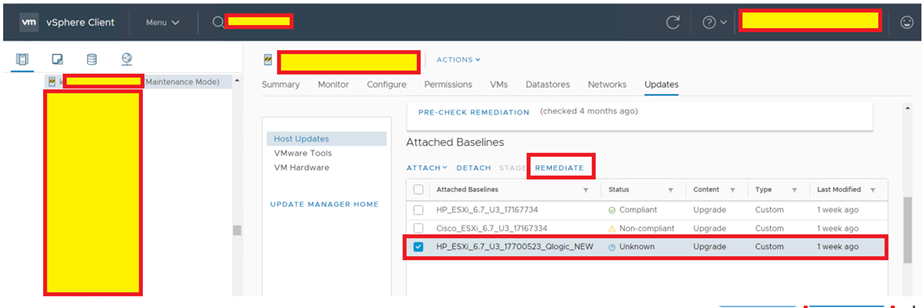
- Once the baseline is populated, select on RemediateImage may be NSFW.
Clik here to view.![Remediate Baseline]()
- Once the baseline is populated, select on RemediateImage may be NSFW.
-
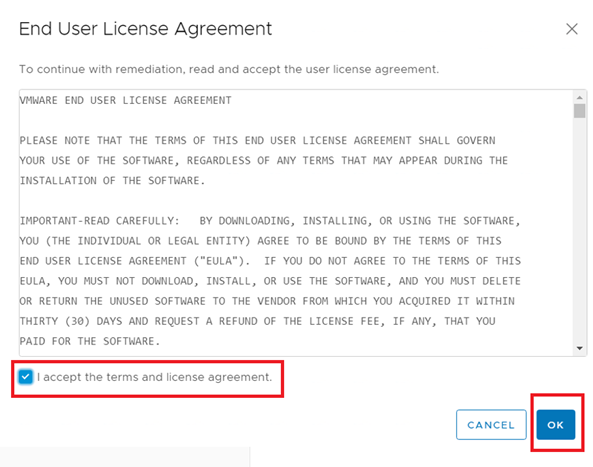
- Select the End User License Agreement and select OKImage may be NSFW.
Clik here to view.![End User License Agreement]()
- Select the End User License Agreement and select OKImage may be NSFW.
-
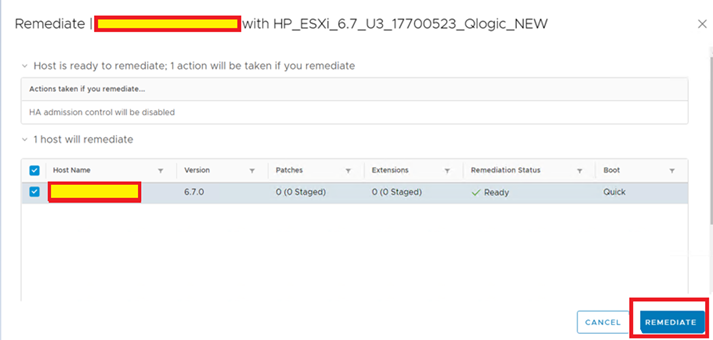
- Select Remediate option and upgrade will startImage may be NSFW.
Clik here to view.![Choose Remediate Option]()
- Select Remediate option and upgrade will startImage may be NSFW.
-
- The server will reboot after the completion of the upgradeImage may be NSFW.
Clik here to view.![Reboot after completion of upgrade]()
- The server will reboot after the completion of the upgradeImage may be NSFW.

Option 2: Upgrading Using ESXCLI Command Line
- To upgrade the server Via CLI, ensure SSH service is enabled, otherwise the connection is not established for the server via putty.
- Download the required image on your local desktop
- Host to be in Maintenance Mode
- Copy the image to local ESXi host using WINSCP tool to Var/Temp folder
- SSH and login to the server using the Putty tool
- Navigate to the path CD / var/tmp
- Run the below Command:
“esxcli software profile update -p ESXI-6.7.0-XXXXXXX-standard -d /VMFS/Volumes/XXXXXXXXXX/Var/temp/Vmare-ESXI-6.7.0-XXXXXXX-depot.zip”
Learn the Command in Detail
- esxcli software profile update:- is going to perform an update
- -p ESXI-6.7.0-XXXXXXX-standard :- is the patch release name
- -d /VMFS/Volumes/XXXXXXXXXX/Var/temp/ :- is the directory where ISO is copied
- VMware-ESXi-6.7.0-XXXXXXX-depot.zip :- An update to be performed
Once the update is successful, the server will need a reboot. Good luck!
The post How to Upgrade a VMware ESXi Host appeared first on Applied Information Sciences.